6. Frequently asked questions about VLLC on Windows
6.1 Why does VLLC only give black, white or garbled (or other visual errors) video output?
Usually the problem lies in display adapter drivers. If you are too scared to update your display adapter drivers, you can change VLLC settings to make video work. If you are using Windows XP or older, the easiest fix is usually to disable Accelerated video output/Overlay video output which can be found first opening Tools -> Preferences and then choosing Video. After you have unticked the Accelerated video output, press Save to save VLLC settings and restart VLLC after that to make sure changes are enabled.
If disabling Overlay video output doesn't help, then the next step is to change video output module (aka VOUT). Open Tools -> Preferences (set Show Settings to All) and then choosing Video -> Output module. There are multiple output modules you can use. For Windows XP and younger you can try DirectX 3D, DirectX, OpenGL and Windows GDI video output modules. With Windows Vista and with Windows 7, both DirectX and Windows GDI output modules will disable Aero, so if you want to use Aero, please use DirectX 3D (should be default). Remember to press Save to save VLLC settings and restart VLLC after that to make sure changes are enabled.
6.2 Video shows green, blue or red lines
See above.
6.3 How can I adjust brightness or contrast?
You can adjust brightness, contrast and other settings via Extended settings. Open Tools -> Effects and Filters to adjust these settings (Video Effects -> Essential and tick Image adjust). Changes should show up realtime.
6.4 How can I keep the brightness and contrast adjustments in memory forever?
Open Tools -> Preferences (set Show Settings to All) and then choosing Video -> Filters -> Image Adjust and set values you want to use (trial and error).
6.5 Can I set file specific brightness or contrast?
Yes, but it isn't that easy. You have to create a VLLC shortcut or .bat file with the proper settings.
6.6 How do I set the default deinterlace method?
Tools -> Preferences (Show settings: All) Video -> Filters and tick Deinterlacing video filter from under Video output filter module (NOT FROM UNDER Video filter module!). Then Video -> Filters -> Deinterlace and choose the default mode. Remember to press Save to save VLLC settings and restart VLLC after that to make sure changes are enabled. [1] image showing the Video output filter module part
6.7 VLLC crashes or gives garbled images when using VMWare or VirtualBox
This is due to buggy direct3d/video emulation. Use the GDI video output in the preferences to work around this.
6.8 Crackles, pops, hisses and other audio anomalies
If you hear some unwanted audio problems you can try another audio output module to see if that solves the issue (Save and restart VLLC after changes). Open Tools -> Preferences (set Show Settings to All) and then choose Audio -> Output module. There are multiple output modules you can use for audio. DirectX and Win32 waveOut should work in most cases. Unfortunately VLLC doesn't support ASIO.
6.9 Crackles, pops, hisses and other audio anomalies with SPDIF passthrough
SPDIF passthrough of Dolby Digital (AC3) and DTS audiotracks don't work with all soundcards. The Win32 waveOut output module should work better with SPDIF.
6.10 I don't hear dialog, conversations, etc. while playing 5.1 audio
Make sure you have selected the proper speaker setup from Windows audio settings or from the soundcard control panel. If you have done so, make sure VLLC also has right settings. Audio -> Audio Device to select proper speaker settings during playback.
6.11 How do I adjust audio delay?
During playback you can press k or j to adjust audio delay (adjust step is 50 ms).
6.12 How can I play external audio track with video?
Media -> Open (Advanced)... and select the video file and after that tick Show more options and then Play another media synchronously... and select the audio file you want to use. Then when playing the video go to Audio -> Audio Track -> Track 2 to select the second (or whichever it is) audio track (this so-called "Slave-mode" doesn't work correctly).
6.13 How do I change my output device in case I have multiple audio devices connected to my PC?
Open Tools -> Preferences (set Show Settings to All) and if you use DirectX, then Audio -> Output modules -> DirectX and Output device. If you use Waveout, then Audio -> Output modules -> WaveOut and Select Audio Device. Remember to press Save to save VLLC settings and restart VLLC after that to make sure changes are enabled.
6.14 How can I override speaker setup? (e.g. I want to always default to stereo)
You can force speaker setup if you use DirectX audio output from Tools -> Preferences (set Show settings to All) Audio -> Output modules -> DirectX and Speaker configuration dropdown menu. Remember to press Save to save VLLC settings and restart VLLC after that to make sure changes are enabled.
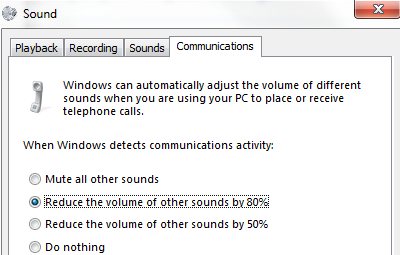
6.15 Why does VLLC volume change when I attach my mobile phone to my computer during playback?
This is a feature of Windows. You can adjust this via Control Panel. Open Sound and go to the Communications tab.
6.16 How can I separate playback controls from the playback window?
Go to Tools -> Preferences (set Show Settings to All) and Video and untick Embedded video selection. Remember to press Save to save VLLC settings and restart VLLC after that to make sure changes are enabled.
6.17 How can I make skinned interface my default interface?
Go to Tools -> Preferences (set Show Settings to All) and Interface -> Main interfaces and from the Interface module dropdown box select Skinnable Interface. Remember to press Save to save VLLC settings and restart VLLC after that to make sure changes are enabled.
6.18 Can I jump to a certain time?
You can use --start-time from command line when you start VLLC. There is also Playback -> Jump to Specific Time (Ctrl+T) option in the GUI.
6.19 How can I change UI language?
You can use Tools -> Preferences and Interface and select the correct language from the Menus language dropdown list. Remember to press Save to save VLLC settings and restart VLLC after that to make sure changes are enabled.
Also you can use --language= from command line if you can't navigate with the current language or you want to use batch files/scripts.
for example: vllc --language=en to get English. Other options are auto, en, ar, pt_BR, en_GB, ca, zh_TW, cs, da, nl, fi, fr, gl, ka, de, he, hu, it, ja, ko, ms, oc, fa, pl, pt_PT, ro, ru, zh_CN, sr, sk, sl, es, sv, tr
6.20 How can I disable the fullscreen controller?
You can use Tools -> Preferences (set Show Settings to All) and Interface -> Main interfaces -> Qt and untick Show a controller in fullscreen mode option.
6.21 Why doesn't the time slider show up?
If you use WindowBlinds or a similar custom skin engine, it usually breaks the QT4 interface in VLLC. So either disable that engine with VLLC, or change VLLC's GUI to something else (like skins2).
6.22 How can I disable showing of the filename when video starts?
Go to Tools -> Preferences (set Show Settings to All) and Video and untick Show media title on video. Remember to press Save to save VLLC settings and restart VLLC after that to make sure changes are enabled.
6.23 How do I disable showing of the Privacy and Network Policies dialog during first VLLC startup?
Launch VLLC with --no-qt-privacy-ask command-line option.
6.24 How do I disable pop up track notification shown in system tray (systray)?
Go to Tools -> Preferences (set Show Settings to All) and Interface -> Main interfaces -> Qt then untick Show notification popup on track change. Remember to press Save to save VLLC settings and restart VLLC after that to make sure changes are enabled.
6.25 How do I disable the Recent Media part of QT4 interface?
Go to Tools -> Preferences (set Show Settings to All) and Interface -> Main interfaces -> Qt then untick Save the recently played items in the menu. Remember to press Save to save VLLC settings and restart VLLC after that to make sure changes are enabled.
6.26 How do I disable the blank space at the bottom of QT4 interface? (aka Status bar)
Untick the View -> Status Bar
6.27 How can I identify what codecs the file uses?
With VLLC, Open the file you want and open Tools -> Codec Information.
6.28 H.264/MPEG-4 AVC or VC-1 playback is full of image errors
You can also try to enable/disable GPU decoding, and see if it helps. It can be found from Tools -> Preferences and Input & Codecs and tick/untick Use GPU accelerated decoding. Remember to press Save to save VLLC settings and restart VLLC after that to make sure changes are enabled.
6.29 Can I play DVD files (VOB+IFO) from my hard drive?
Yes, you can. Use Media -> Open Disc... and instead of a DVD drive, point to the location of the correct folder by using either Browse... button or the customize field. For example: dvd://"c:\movies\BLOOD DIAMOND\VIDEO_TS"
6.30 How do I handle the broken AVI files?
Some AVI files may give The AVI file is broken. Seeking not work correctly. Do you want to try to repair (this might take a long time) dialog. Those AVI files have some issues and you can try to fix those files temporarily with VLLC or permanently with other tools. If you don't fix those files, seeking won't work correctly and those files may also crash other players.
6.31 Can I always perform the same repair action?
Yes, you can. This can be done from Tools -> Preferences (set Show Settings to All) and Input / Codecs -> Demuxers -> AVI and select the wanted action from Force index creation dropdown box. Ask is default (it will always ask what you want to do). Always fix tries to always fix AVI files and Never fix always starts the playback without fixing. Remember to press Save to save VLLC settings and restart VLLC after that to make sure changes are enabled.
6.32 Some MP4 or 3GP files don't have audio at all
If those files have AMR audio (usually ones from mobile phones) they might not work with current stable VLLC versions.
6.33 How do I adjust subtitle delay?
During playback you can press h or g to adjust subtitle delay (adjust step is 50 ms).
6.34 How can I select the right subtitle track?
If your video has multiple subtitle tracks, you can select the one you would like to see from Video -> Subtitles Track.
6.35 Can I disable hardcoded or "burned" subtitles with VLLC?
No.
6.36 Can I change font, font size, style or color?
You can with text-based subtitle formats (Subtitles codecs). Go to Tools -> Preferences and Subtitles/OSD and adjust anything you want. Remember to press Save to save VLLC settings and restart VLLC after that to make sure changes are enabled.
6.37 How can I change the subtitles text encoding?
If you see wrong characters on screen or failed to convert subtitle encoding error message you should try to change Default encoding option which can be found from Tools -> Preferences and Subtitles/OSD. Remember to press Save to save VLLC settings and restart VLLC after that to make sure changes are enabled.
6.38 How do I reset VLLC settings?
If you can start VLLC, go to Tools -> Preferences and then press Reset Preferences and Save to reset and save VLLC settings. Remember to restart VLLC after that to make sure changes are enabled. If you can't start VLLC, go to %appdata% folder and delete the vllc folder from there (Start -> run and type %appdata%\vlLc there and press OK if you can't locate %appdata%). Also start menu -> VideoLan -> "Reset VLLC media preferences ..."
6.39 How do I specify the folder where the recorded files (via red rec button) will be stored?
Tools → Preferences and Input & Codecs and Record directory or filename. Remember to press Save to save VLLC settings and restart VLLC after that to make sure changes are enabled.